Follow these steps to setup Kongu_Wifi Wireless
Automatically Connection Using Script - Install Once:
Windows 7
From this page you can load the Kongu_Wifi installation program fast and easy. You have to run the installation program only once. After this you will connect to the fast and safe Kongu_Wifi network automatically everywhere it is available. Download the installation program from the following link: http://kongu.edu/support/Win7Profile.exe
- Choose OKand the program makes the Kongu_Wifi installations automatically. You can alternatively save the file on your machine and run it later.
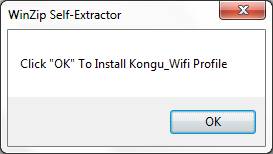
- The window opens and informs of the successful Kongu_Wifi installation. Press OK.

- Now you can connect to the wireless Kongu_Wifi network. A balloon opens over the network icon and by clicking it you get the authentication window.
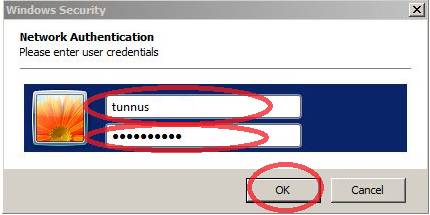
- Write your Net-id username and password and click OK.
(If you do not know your username or your password, you will be able to check your information from http://kongu.edu/support/netid/
- Join the Kongu_Wifi network by pressing OK.
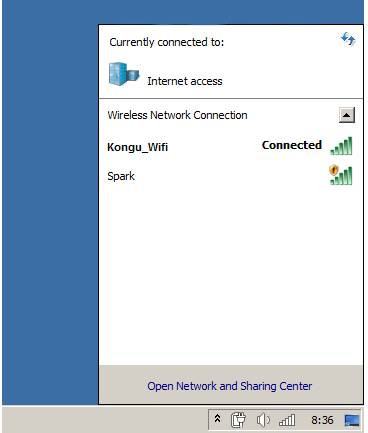
- To see that you are successfully connected to the Kongu_Wifi network.
- If there are problems on connecting to Kongu_Wifi or you need help or you have something to ask, please contact e-mail address: admin@kongu.ac.in
Manually Connect Kongu_Wifi Network Connection
-
Go To Control Panel
-
Go To Network and Internet (or click on Network and Sharing Center and skip to step 4 if you have changed the control panel view)
-
Go To Network and Sharing Center > view network status and tasks
-
Click on Manage wireless networks (in the menu on the left)
-
Click on Add
-
Select Manually create a network profile
-
Enter the wireless settings as follows:
Network name: (Kongu_Wifi)
Security type: WPA2-Enterprise
Encryption type: AES
Security Key: leave blank
Start this connection automatically should be checked
Click Next -
Click on Change connection settings
-
Click on the Security Tab
-
Click the settings button
-
Uncheck: Validate server certificate
-
Click the Configure button
-
Uncheck: Automatically use my Windows logon name and password (and domain if any)
-
Click OK 3 times to close the settings, then click Close to save settings.