
Windows 7 WiFi Setup Guide
Automatic Connection Using Script
From this page you can load the Kongu_Wifi installation program fast and easy. You have to run the installation program only once. After this you will connect to the fast and safe Kongu_Wifi network automatically everywhere it is available.
Download Windows 7 Installation Profile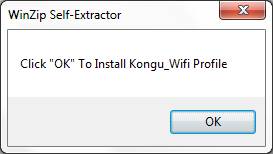
1. Choose OK and the program makes the Kongu_Wifi installations automatically. You can alternatively save the file on your machine and run it later.
2. The window opens and informs of the successful Kongu_Wifi installation. Press OK.
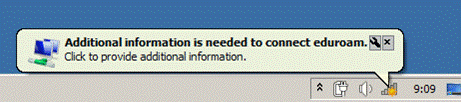
3. Now you can connect to the wireless Kongu_Wifi network. A balloon opens over the network icon and by clicking it you get the authentication window.
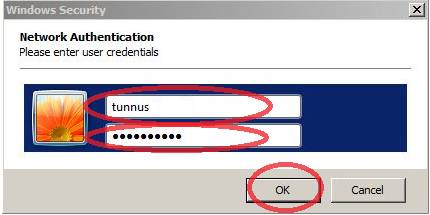
4. Write your Net-id username and password and click OK.
If you do not know your username or your password, you will be able to check your information from Password Manager
5. Join the Kongu_Wifi network by pressing OK.
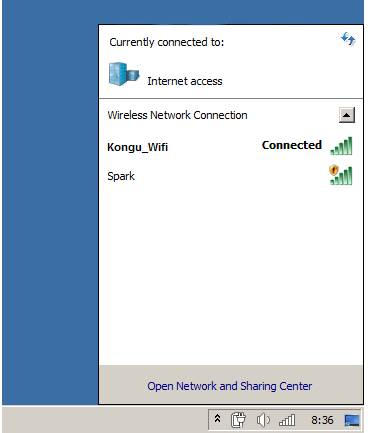
6. To see that you are successfully connected to the Kongu_Wifi network.
If there are problems on connecting to Kongu_Wifi or you need help or you have something to ask, please contact e-mail address: admin@kongu.ac.in
Manual Connection Method
1. Go To Control Panel
2. Go To Network and Internet (or click on Network and Sharing Center and skip to step 4 if you have changed the control panel view)
3. Go To Network and Sharing Center > view network status and tasks
4. Click on Manage wireless networks (in the menu on the left)
5. Click on Add
6. Select Manually create a network profile
7. Enter the wireless settings as follows:
- Network name: Kongu_Wifi
- Security type: WPA2-Enterprise
- Encryption type: AES
- Security Key: leave blank
- Start this connection automatically should be checked
8. Click Next
9. Click on Change connection settings
10. Click on the Security Tab
11. Click the settings button
12. Uncheck: Validate server certificate
13. Click the Configure button
14. Uncheck: Automatically use my Windows logon name and password (and domain if any)
15. Click OK 3 times to close the settings, then click Close to save settings.